
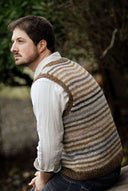


Alberta
Pattern Specs
FINISHED DIMENSIONS
- 37 (41, 45, 49, 53)” finished garment at chest
Need help picking a size? See our resource page on Selecting a Sweater Size 101.
GAUGE
- 4.5 stitches & 6 rounds = 1″ in stockinette stitch
NEEDLES
- One 16” & 32” circular needle in size needed to obtain gauge
- Suggested size: US 8/5 mm
Pattern Materials
YARN
- Approx. 150 (160, 170, 185, 200) grams of worsted weight wool in each Main Color (MC) and Contrast Color (CC)
- 100 grams worsted weight wool in Trim Color (TC)
- Sample shown uses a solid for MC (Oatmeal) & TC (Brown) and a self-striping yarn for CC
Techniques
Errata
21 November 2023: Version 2.1
Under Establish Armhole Steeks on page 3, the "Next Round" instructions have been corrected to read as follows: "Remove beginning-of-round (BOR) marker, knit 6 (7, 8, 9, 9) stitches, now slip the 6 (7, 8, 9, 9) stitches just worked onto waste yarn, knit 71 (79, 85, 93, 101) stitches across Front, [...]."
11 March 2014: Version 2.0
The pattern has been updated to reflect a striping sequence of 3 rows MC and 3 rows CC, rather than 2, as follows: Page 3, before Begin Striping Sequence: “Switch to Main Color (MC) and knit two rounds. Continue with MC for the following Increase Round:” Page 3, after Begin Striping Sequence: “Rounds 1 – 3: Knit all stitches with Contrast Color (CC). Rounds 4 – 6: Knit all stitches with Main Color (MC). Repeat the last six rounds, establishing striping sequence until work measures 14 (14, 14½, 15, 15)” from cast-on edge.”
30 September 2011
Page 3, First column: “ESTABLISH ARMHOLE STEEKS: Next Round: Remove marker, knit first 6 (7, 8, 9, 9) sts, now slip those 6 (7, 8, 9, 9) stitches just worked to waste yarn, continue around front, knitting 71 (79, 85, 92, 101), slip the next 12 (14, 16, 18, 18) sts to waste yarn, place SM, CO 5, place another SM, knit until 6 (7, 8, 9, 9) sts rem in round, slip these sts onto the same waste yarn as beg of round, place SM, cast on 5, place 4th and final SM (this will also be your beg-of-round marker), join work to begin knitting in the round.
Alberta
Uncompromising Excellence in Every Detail