Swatching 101
There are few things that are more important to successful garment knitting than gauge swatching. Taking the time to swatch before casting on a project gives you a chance to familiarize yourself with the characteristics of a chosen yarn, and saves time later that may otherwise be spent troubleshooting the fit of your garment or the hand of your finished fabric. If you’ve ever spent countless hours completing a handknit sweater only to find out at the finish line that your gauge was incorrect and the garment doesn’t fit, you’ve learned the importance of swatching the hard way! (We’ve been there…)
While we all experience the urge for an immediate cast on when inspiration strikes, don’t cheat yourself out of the benefits of this foundational step. Are you new to swatching or in need further convincing of its myriad benefits? If so, read on.

Set Aside Time
If you struggle with the patience for swatching, we find it helpful to dedicate an afternoon or evening in advance of your cast-on date to knit, block, and, if necessary, troubleshoot your swatch in one chunk of time. It’s helpful to remind yourself at this stage, too, that swatching is actually saving time (and undue stress) for your future self.
Knitting a Swatch
The goal of swatching is to simulate the fabric of your finished garment as closely as possible. For this reason, it’s important to knit your swatch under the same conditions you’ll knit your project, using the same size and material of needles. And since blocking knitted fabric can significantly affect your final gauge measurement (as well as the hand of your fabric), be sure to employ the same blocking techniques (steaming, wet-blocking, etc.) that you’ll use on your finished garment.
While knitting patterns almost exclusively refer to gauge over a 4-inch square, you’ll have better results creating swatches a bit larger than this standard. A generous swatch ensures your 4-inch measurement will be more accurate and won’t be distorted by edge stitches. For better results, cast on enough stitches to knit a 6- or 8-inch square; a swatch of this size provides an amount of fabric that allows for a better assessment of the drape and weight of your blocked garment fabric. With this target swatch size in mind, use the suggested gauge measurement on your yarn label or within your knitting pattern’s instructions to calculate the total number of stitches to cast on. If working in stockinette stitch, prevent your swatch from curling by working 3 or 4 stitches at the beginning and end of each row in garter (knit on RS and WS) as well as a few garter ridges at the top and bottom edges of the swatch. For example, if the suggested gauge is 5 stitches per inch, for a 6-inch gauge swatch with edge stitches cast on 30 stitches plus 6-8 additional stitches for a 3-4 stitch edge at either side.
Resist the urge to measure your gauge before your swatch is bound off. In-progress swatches will not give an accurate finished gauge reading, and if you need to be frugal with your yardage, remember you can always unravel your swatch later if you find you need more yarn to finish your project.

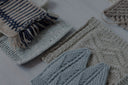
Pro Tip: For stockinette swatches (or other non-heavily patterned stitches) you can log your needle size by working a number of purl stitches or yarn overs in the fabric that corresponds to your needle size. In so doing, your needle size will be inextricably linked to the swatch you’ve created so you’ll never wonder what size needle you used to create it. You won’t have to worry about paper labels, which can easily tear and become separated from swatches over time. If you count the yarn overs worked on some of the swatches pictured in this post, you’ll be able to see which needle sizes were used to knit them.
Swatching for Circular Knitting
Circular knitting, in which every round is worked from the Right Side, can produce a different gauge than flat knitting due to a subtle variation in tension between knitting and purling that many knitters experience. In keeping with our rule above about simulating the fabric of your final garment, when preparing for a circular project, swatching in the round is the best approach.
Our favorite trick for gauge prep on circular garments is “Speed Swatching” which allows an accurate representation of circular knitting without casting on a large number of stitches. Here’s how:
Using a circular needle, cast on the desired number of swatch stitches (the 6” principle discussed above also applies here) and knit one row. Rather than joining the work to knit in the round, slide the live stitches back to the rightmost tip of the needle. Leaving a long tail floating loosely across the back, bring the yarn to the other end and knit from the first stitch on the needle, across your row of stitches again. Repeat this maneuver, sliding and bringing your yarn back to the tip of the needle, for the desired number of rounds. Note that you are knitting all rounds from the Right Side, just as you will be when working a circular garment.
As you work you may notice your selvedge stitches are loose and messy — it’s good to get into the habit of tidying up your edge stitches every few rounds to keep them neat. Some knitters find that stitches along one selvedge edge are looser than the other, but both sides should be snugged up as you work for best results. If you’re swatching stranded fabric with two colors (as shown in our swatch below), knit the first and last two stitches of every round with both colors held together. This will lock each of your colors securely at either end of your swatch. (Your gauge will not be affected by these doubled edge stitches.)
When you’ve worked the necessary number of rounds in your swatch, bind off all stitches. The back of your speed swatch will have several long floats draping across the back, one float for every round worked.

Use scissors to cut the long floats at the back of your swatch down the center in order to allow your swatch to lie completely flat. The “fringe” created after you cut can be trimmed cleanly at each edge to make blocking your swatch more manageable — see the photo of our colorwork swatch above. Block and finish your swatch as outlined below.
Blocking Your Swatch
Block your swatch in the same manner you’ll use when finishing the final garment, whether by steaming or wet-blocking. You may wish to pin the corners of your swatch, or even use blocking wires along the sides of your swatch, to get a clean finish with straight edges. This will improve the ease and accuracy of measuring your final gauge. Unless your particular pattern calls for stretch blocking, avoid the temptation to stretch your swatch while blocking as you want to capture the fabric’s natural, relaxed gauge.
Blocking is a particularly important step when swatching for colorwork projects. You will want to make sure that your swatch contains all of the colors you plan to use in your project, and wet-block the swatch to see if any bleeding occurs so that you know whether precautionary measures to fix the dye in your yarn are necessary.
A post-blocking rest period is also good practice, particularly for yarns with a bounce and spring that will often retract slightly after blocking. If possible, allow the fabric 12-24 hours to relax after drying/unpinning before taking final measurements.

Measuring Your Finished Gauge
Lay your swatch flat on a smooth surface. Use a ruler to count the number of stitches within 4 inches across the center of the fabric. (Avoid flexible measuring tapes as they can stretch over time and give less accurate readings than rigid measuring devices.) This is your stitch gauge over 4 inches. To obtain your stitch gauge over 1 inch, divide this stitch count by 4.
To measure your row gauge, rotate your ruler 90 degrees and, aligning your ruler with the top of a stitch from the center of the swatch, count the number of stitches within 4 inches. As before, divide this number by 4 to calculate your row gauge over 1 inch, if desired.
If you’re measuring gauge in a repeating pattern such as lace or cables, it can also be helpful to measure the width and height of a given repeat. If you have an 18-stitch cable panel that measures 3″ wide, your stitch gauge in pattern is 6 stitches per inch, which will be different than your gauge in a section of stockinette or moss stitch within the same garment (because cables involve crossing groups of stitches over one another, they require more stitches per inch than non-cabled fabrics).
Compare Gauge to Pattern, Make Adjustments if Necessary
Now that you’ve determined your swatch’s gauge, compare your stitches and rows per inch to your pattern’s gauge requirements. Is it a perfect match? Do you have more stitches within four inches than you should? Less?
If you count more stitches per inch on your swatch than is required for pattern gauge, you will need to swatch with a larger needle. If there are fewer stitches per inch, you will need to use a smaller needle to achieve correct gauge. If either scenario occurs, repeat the swatching process, adjusting the needle size accordingly.
If your stitch gauge is correct but your row gauge is off, we recommend trying a needle of the same size but in a different material for your next swatch. The type of needle used (wood, aluminum, bamboo, carbon, etc.) is a common cause of row gauge variance since the surface resistance of your needles (how smooth or “grippy” they are) affects your tension as you knit.
Go Forth and Swatch!
We hope these pointers help to illustrate how swatching can set you up for success in your own knitting. If your first swatch does not produce the fabric you want for your project, keep at it. Once your desired results are achieved, you will have gifted yourself hours of enjoyable, worry-free knitting for the entirety of your project.
Shop our Latest Patterns


Checkers

Cyro
Diamants Cowl


Diamants Hat


Matches


Diverge


Grooves

Loomed